| The
mechanics of making a custom decal are simple. You take the mucilage paper to a "dry toner process" copying machine
where you copy an image onto the mucilage paper, just as you would any paper in a copier. If an image you have is in color, then
use color copier to place image
onto the mucilage paper. After
the mucilage sheet comes through the copier, of the page because the toner will flake
off if handled roughly. Gently lay a "blank" page of copier paper on top of the
imaged mucilage paper to protect it until you can the mucilage sheet with Great Planes "" which comes in an aerosol can. You can utilize any lacquer based clear
aerosol you wish...just be sure it has an ultraviolet inhibitor to prevent it from Follow painting instructions and precautions printed on each can.
These direct you to spray a light dusting coat, followed shortly by a flow coat, or wet coat. Do not coat the face of the
sheet excessively, because this is lacquer and depending on the humidity, it will frost
and not be crystal clear. After the paint has completely dried, oh say no less than 24 hours...yea, I hear you thinking...this is lacquer
and it'll dry in seconds!!! No it's a relative of the lacquer family...and requires a
compete gas off, before step two(2)!!!
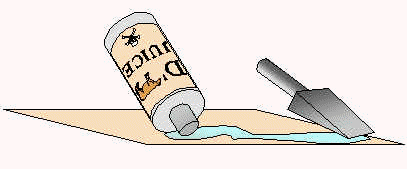
After the lacquer has dried completely, you will coat the mucilage paper with one thin coat of decal restorer, or decal polymer. This is a product sold at hobby shops selling high end, more expensive plastic models. The decal restorer provides body to the decal. This "flex" coating makes it possible to position the decal during the application phase without it falling apart or desolving when handled. Using a two (2) inch wide foam brush (typically under 50 cents at your local hardware store) place a drop of Decal Fluid / Restorer about two (2) inches in diameter in the center of your mucilage page. Working outward, brush this polymer in one direction move from center of the drop, outward to the edge(s) of the page, or atleast one (1) inch beyond the image you desire to become a decal. Following the decal restorer instructions, recoat the mucilage paper image a minimum of three (3) times. Remembering to use a NEW and clean foam brush for each coat. If you attempt to recoat with anything other than a new FOAM brush, it will mess up!!!! Let dry in a well ventilated area for no less than 24 hours!!! Experiment with the number of coats you apply to the decal. |